Python第二十天 shutil 模块 zipfile tarfile 模块
注意:压缩打包/解压解包目录和文件使用tarfile模块而不要使用shutil 模块!!!
os文件的操作还应该包含移动 复制 打包 压缩 解压等操作,这些os模块都没有提供
shutil 模块也是封装的os模块
#shutil 模块的源码
import os
 sys

 'bytes' paths are not properly supported: they don't work with all functions,
# sometimes they only work partially (broken exception messages),and the test cases don't use them.

from typing  (
    List,Iterable,Callable,Any,Tuple,Sequence,NamedTuple,IO,AnyStr,Optional,Union,Set,TypeVar,overload,Type,Protocol,Text
)
shutil 模块
shutil.copyfileobj(fsrc,fdst[,length=16*1024]) #copy文件内容到另一个文件,可以copy指定大小的内容
文件拷贝操作
shutil.copyfile(src,dst) #copy文件内容,是不是感觉上面的文件复制很麻烦?还需要自己手动用open函数打开文件,在这里就不需要了,事实上,copyfile调用了copyfileobj
shutil.copymode(src,dst) #仅copy权限,不更改文件内容,组和用户。
shutil.copystat(src,dst) #复制所有的状态信息,包括权限,组,用户,时间等
shutil.copy(src,dst) #复制文件的内容以及权限,先copyfile后copymode
shutil.copy2(src,dst) #建议使用这个来拷贝,复制文件的内容以及文件的所有状态信息。先copyfile后copystat
示例:shutil.copy2('/tmp/123.txt','/tmp/MysqL/123.txt')
目录操作
shutil.copytree(src,dst,symlinks=False,ignore=None,copy_function=copy2,ignore_dangling_symlinks=False) #递归的复制文件内容及状态信息,目标目录不需要预先创建
shutil.rmtree(path,ignore_errors=False,onerror=None) #递归地删除文件,不管目录是否为空都会删除,建议用这个,不用os.rmdir和os.removedirs
示例
剪切文件操作
shutil.move(src,dst) #递归的移动文件
示例:
shutil.move(') 在同一个目录下,对于目录就是改名,MysqL2这个目标目录不需要预先创建
shutil.move(/tmp/MysqL2/123.txt/tmp/MysqL3/123.txt') 对于文件就是剪切
shutil模块是高层次的文件接口,除了包含文件和目录的操作函数以外,还包含了压缩包的创建和解压
shutil 支持的格式可以通过get_archive_formats 函数获取。如下所示:
print shutil.get_archive_formats()
[('bztar',"bzip2'ed tar-file"),
('gztar',"gzip'ed tar-file"),
('tar','uncompressed tar file'),
('zip','ZIP file')]
创建压缩包
shutil.make_archive(base_name,format,root_dir=None,base_dir=None,verbose=0,dry_run=0,owner=None,group=None,logger=None)
base_name: 必须参数,压缩打包后的文件名或者路径名,只是文件名时,则保存至当前目录下,否则保存至指定路径
format: 必须参数,,取值只能是get_archive_formats的输出结果,压缩或者打包格式 "zip","tar","bztar"or "gztar"
root_dir : 指定要压缩的路径根目录(默认当前目录),只能指定路径,优先级低于base_dir
base_dir : 指定要压缩文件的路径,可以指定路径下的文件名,也可以指定路径
root_dir 和 base_dir 默认设置为当前目录,root_dir 和 base_dir 一般可以认为是一样的
https://docs.python.org/2.7/library/shutil.html?highlight=make_archive#shutil.make_archive
shutil.make_archive('tarball','gztar',root_dir='/tmp/MysqL')
解压压缩包(python3才有)
shutil.unpack_archive(filename,extract_dir=None,format=None)
filename :压缩包名称
extract_dir :解压以后保存的目录
format :压缩包的格式
注意:文件夹不存在会新建文件夹
shutil.unpack_archive('backup.tar.gz',extract_dir='/tmp/',format='gztar')
zipfile
zipfile模块
ZipFile类
zipfile.ZipFile(zipfilename,'a')
a:添加文件到压缩包
r:读取压缩包内容
w:生成一个压缩包
zipfile类常用方法
namelist : 返回zip 文件中包含的所有文件和文件夹的字符串列表;
extract : 从zip 文件中提取单个文件;
extractall :从zip 文件中提取所有文件。
ZipFile.write(filename,arcname,compress_type)
arcname:使用ZipFile.write增加文件时,会把文件本身的路径也加进去,加上arcname就能根据自己的命名规则将文件加入zip包
ZipFile.extractall(path,members,pwd)
path:解压到指定目录
members:只解压压缩包里某个文件
pwd:指定压缩包里的解压密码,zip可以加密压缩
注意:python2.6不支持with xx as的写法,不管是zipfile 还是 tarfile 模块
z = zipfile.ZipFile('/tmp/aa.zip','w',zipfile.ZIP_DEFLATED)
z.write('/tmp/aa.py')
z.close()
python2.6不支持with xx as的写法github地址:https://github.com/mgedmin/check-manifest/issues/22
示例
压缩单个文件
如果要对文件进行压缩,zlib模块是必须的,如果zlib可以使用,你可以使用zipfile.ZIP_DEFLATED设置压缩模式为单个文件或者归档一个整体。
默认的压缩模式是zipfile.ZIP_STORED。
 zipfile
 os
with zipfile.ZipFile(/tmp/aa.zipw,zipfile.ZIP_DEFLATED)  as z:
    z.write(/tmp/aa.py')
或
z = zipfile.ZipFile()
z.close()
解压文件
with zipfile.ZipFile(/tmp/123.zipr) as z:
    z.extractall(path=/tmp/123456')       解压全部,可设置解压路径,输入解压密码
递归压缩某个目录下所有文件
def compress_file(zipfilename,dirname):       zipfilename是压缩包名字,dirname是要打包的目录
    if os.path.isfile(dirname):
        with zipfile.ZipFile(zipfilename,) as z:
            z.write(dirname)
    else:
        with zipfile.ZipFile(zipfilename,1)">) as z:
            for root,dirs,files in os.walk(dirname):
                for single_file  files:
                    if single_file != zipfilename:
                        filepath = os.path.join(root,single_file)
                        z.write(filepath)

compress_file(a.zip. 执行函数
def addfile(zipfilename,dirname):
    atest.txt')
查看压缩包中的文件
 viewfile(zipfilename):
    with zipfile.ZipFile(zipfilename,1)">) as z:
        print(z.namelist())
        print(z.namelist())      查看压缩包中的文件列表
        print(z.read(z.namelist()[0]))   读出来压缩包中的第一个文件的内容打印到屏幕,也可保存到文件中

viewfile(')
tarfile模块
python2.7的tarfile只支持两种压缩工具的压缩包和解压包,gzip、bzip2
常用函数
getnames :获取tar 包中的文件列表
extract :提取单个文件
extractall :提取所有文件
添加了arcname不会将文件所在目录tmp添加到压缩包里,解压出来会把文件直接解压到当前文件夹
不添加arcname则会将文件所在目录tmp也添加到压缩包里,解压出来会把tmp解压出来,所以文件放在tmp目录下
建议是不添加arcname,这样解压出来就不会把所有文件解压在当前目录很混乱,MysqL压缩包也是这种做法
MysqL-5.7.18-linux-glibc2.5-x86_64.tar.gz
t = tarfile.open('/tmp/a.tgz','w:gz')
t.add('/tmp/aa.py',arcname='aa.py')
t.add('/tmp/22.txt',arcname='22.txt')
t.close()
tar -tf a.tgz
aa.py
22.txt
t = tarfile.open('/tmp/a.tgz','w:gz')
t.add('/tmp/aa.py')
t.add('/tmp/22.txt')
t.close()
tar -tf a.tgz
tmp/aa.py
tmp/22.txt
注意:python2.6不支持with xx as的写法,不管是zipfile 还是 tarfile 模块
t = tarfile.open('/tmp/a.tgz',arcname='22.txt')
t.close()
python2.6不支持with xx as的写法github地址:https://github.com/mgedmin/check-manifest/issues/22
tarfile.open(name=None,mode=’r’,fileobj=None,bufsize=10240,**kwargs)
在打包的过程中可以设置压缩规则,如想要以gz压缩的格式打包
tar=tarfile.open('/path/to/your.tar.gz','w:gz')
其他格式如下表:
tarfile.open的mode有很多种:
mode action
'r' or 'r:*' Open for reading with transparent compression (recommended).
'r:' Open for reading exclusively without compression.
'r:gz' Open for reading with gzip compression.
'r:bz2' Open for reading with bzip2 compression.
'a' or 'a:' Open for appending with no compression. The file is created if it does not exist.
'w' or 'w:' Open for uncompressed writing.
'w:gz' Open for gzip compressed writing.
'w:bz2' Open for bzip2 compressed writing.
TarFile.add(name,arcname=None,recursive=True,exclude=None,filter=None)
name:可以是目录,软连接,文件
recursive:如果name是目录则递归压缩这个目录,默认是true
arcname:使用tar.add()增加文件时,会把文件本身的路径也加进去,加上arcname就能根据自己的命名规则将文件加入tar包
exclude:已经Deprecated
filter:不压缩某些文件
TarFile.extractall(path='',members=None)
path:解压的路径
members:只解压压缩包里某个文件
示例
压缩单个文件并打包
 tarfile
 os

with tarfile.open(/tmp/a.tgzw:gz) as tar:
    tar.add(aa.py)
    tar.add(/tmp/22.txt22.txt')
或
t = tarfile.open()
t.add()
t.close()
解压文件
with tarfile.open(a.tarr:gz) as tar:
    print(tar.getmembers())      查看压缩包内文件成员
    tar.extractall(path=')   解压全部
或
t = tarfile.open(/data/test/MysqL-5.7.18-linux-glibc2.5-x86_64.tar.gz)
print(t.getmembers())      查看压缩包内文件成员
t.extractall(path=/data/test/MysqL 解压全部
t.close()
压缩打包某个目录下所有文件
def compress_file(tarfilename,dirname):     tarfilename是压缩包名字,dirname是要打包的目录
     os.path.isfile(dirname):
        with tarfile.open(tarfilename,1)">'w:gz) as tar:
            tar.add(dirname)
    :
        with tarfile.open(tarfilename,1)">) as tar:
             if single_file != tarfilename:
                    filepath =test.tar)
compress_file(t.tar')
def addfile(tarfilename,single_file)
                    tar.add(filepath)

addfile(ttt.txt)
addfile(ttt')
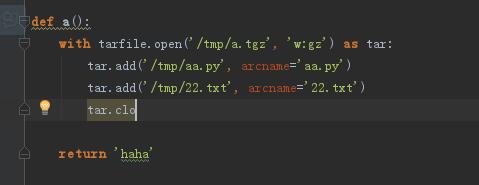
如果语法正确,pycharm可以弹出语法提示
因为用的旧的语法,所以可以出来提示
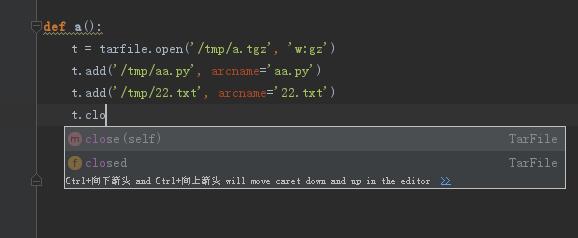
python2.6不能用with xx as语法,所以tar. 不能出来提示