Python第十三天 django 1.6 导入模板 定义数据模型 访问数据库 GET和POST方法 SimpleCMDB项目 urllib模块 urllib2模块 httplib模块 django和web服务器整合 wsgi模块 gunicorn模块
目录
Python第二天 变量 运算符与表达式 input()与raw_input()区别 字符编码 python转义符 字符串格式化
Python第三天 序列 5种数据类型 数值 字符串 列表 元组 字典
Python第四天 流程控制 if else条件判断 for循环 while循环
Python第五天 文件访问 for循环访问文件 while循环访问文件 字符串的startswith函数和split函数
Python第七天 函数 函数参数 函数变量 函数返回值 多类型传值 冗余参数 函数递归调用 匿名函数 内置函数 列表表达式/列表重写
Python第八天 模块 包 全局变量和内置变量__name__ Python path
@L_502_9@
Python第十天 print >> f,和fd.write()的区别 stdout的buffer 标准输入 标准输出 标准错误 重定向 输出流和输入流
Python第十二天 收集主机信息 正则表达式 无名分组 有名分组
Python第十四天 序列化 pickle模块 cPickle模块 JSON模块 API的两种格式
Python第十五天 datetime模块 time模块 thread模块 threading模块 Queue队列模块 multiprocessing模块 paramiko模块 fabric模块
翻译项目
http://python.usyiyi.cn/translate/django_182/index.html
前端模板:(SmartAdmin)http://www.cnblogs.com/smartbooks/archive/2012/12/03/2799416.html
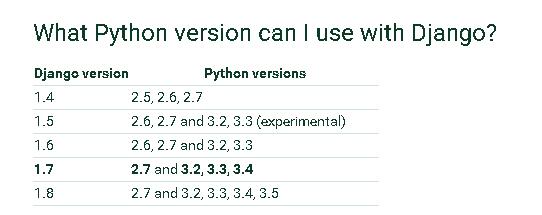
现在主流使用django 1.6
https://docs.djangoproject.com/en/1.7/faq/install/

MVC
M:models.py
V:templates 和views.py
C:urls.py
Django
Django的安装
https://docs.djangoproject.com/en/1.6/
1、pip 安装方式
pip install django==1.6.5
或
easy_install django
查看是否安装成功
pip list
2、源码安装方式
下载tar.gz包
django的源码包
https://pypi.python.org/pypi/Django
python setup.py install
中文文档:
http://djangobook.py3k.cn/2.0/
# 验证django版本
import django
print(django.get_version())
1.5.5
django-admin.py
/usr/bin/django-admin.py
/usr/lib/python2.6/site-packages/django/bin/django-admin.py
创建工程
首先创建一个工程目录:
cd /data/www/
#web为项目名,在当前目录下会新建一个web目录
django-admin.py startproject web
settings.py当前工程的配置文件
urls.py:urls配置文件,MVC里面的C
__init__.py 说明当前是一个包,python可以引入这个目录下的模块
# 修改时区和语言
vim settings.py
TIME_ZONE = 'Asia/Shanghai'
LANGUAGE_CODE = 'zh-cn'
cat /etc/sysconfig/clock
ZONE="Asia/Shanghai"
启动服务:
cd /data/www/web/
python manage.py runserver 0.0.0.0:8880
django目录结构
项目-》应用
项目文件夹里面可以包含多个应用,跟visual studio里面的解决方案下面有多个application一样,最好只创建一个应用,因为一个应用对应一个数据库
cd /data/www/web/
python manage.py startapp blog
或者:
django-admin.py startapp blog
[root@VM_centos web]# ll
total 12
drwxr-xr-x 2 root root 4096 Feb 11 21:00 blog
-rwxr-xr-x 1 root root 246 Feb 11 10:56 manage.py
drwxr-xr-x 2 root root 4096 Feb 11 11:14 web
在项目文件夹里的setting.py
cd /data/www/web/
1. 添加应用:setting.py
INSTALLED_APPS = (
'blog',
2.修改url配置文件urls.py:用户请求的url转给谁去处理
url(r'^blog/index/$','blog.views.index'),
blog:blog目录
views:blog目录下的views.py
index:写在views.py 里面的index函数
3.修改应用视图文件:让views.py文件的index方法来处理此请求:
cd /data/www/web/blog/
vim views.py
from django.shortcuts import render
from django.http  HttpResponse

def index(request):
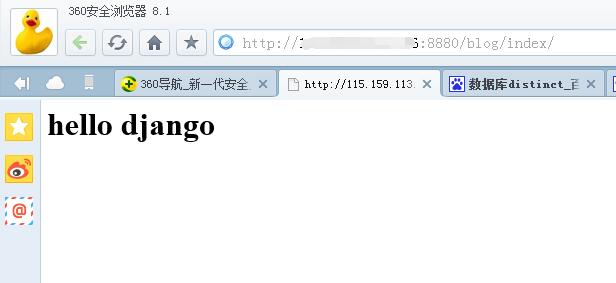
    return HttpResponse('<h1>hello django</h1>')

# Create your views here.
访问:http://192.168.10.2:8880/blog/index

导入模板
cd /data/www/web
mkdir blog/templates
templates:名字不能改
cd blog/templates
vim index.html
<h1> hello </h1>
cd /data/www/web/blog/
vim views.py
修改视图文件views.py
from django.template import loader,Context
1. 创建模板对象,把对应的模板文件导入,自动在templates目录下找到index.html文件
loader.get_template('index.html')
2. 生成Context对象, 空的字典
c = Context({})
3. return HttpResponse(t.render(c))
from django.shortcuts import render
from django.http import HttpResponse
from django.template import loader,Context
# Create your views here.
def index(request):
t = loader.get_template('index.html')
c = Context({})
return HttpResponse(t.render(c))
定义数据模型
Django定义数据模型在App中的models.py文件,数据库的表名称以类的形式来定义:
vim models.py
from django.db  models
 Create your models here.
class Host(models.Model):
    hostname = models.CharField(max_length=50)
    ipaddr = models.IPAddressField()

def __unicode__(self):
    return self.hostname
python manage.py validate //查看models.py的语法和逻辑是否正确,返回0 errors found正确
管理数据
python manage.py validate
初始化模型到数据库,每个应用对应一个数据库,每个数据库都有下面的权限表:
sqlite> .tables
auth_group
auth_user_user_permissions
auth_group_permissions
blog_host
auth_permission
django_admin_log
auth_user
django_content_type
auth_user_groups
django_session
python manage.py syncdb
执行的时候会提示输入django管理界面的用户名和密码(也就是django自带的管理平台的用户名和密码http://192.168.6.3:8880/admin,这个用户名密码会保存到auth_user表里)
打开django管理界面
http://192.168.10.2:8880/admin
确保数据库引擎已经设置好
vim settings.py
DATABASES = {
'default': {
'ENGINE': 'django.db.backends.sqlite3',
'NAME': os.path.join(BASE_DIR,'db.sqlite3'),
}
}
执行python manage.py syncdb之后会生成db.sqlite3文件
[root@VM_centos web]# ll
total 48
drwxr-xr-x 2 root root 4096 Feb 13 13:55 blog
-rw-r--r-- 1 root root 34816 Feb 13 14:04 db.sqlite3
-rwxr-xr-x 1 root root 246 Feb 11 10:56 manage.py
drwxr-xr-x 2 root root 4096 Feb 13 14:01 web
换数据库
https://docs.djangoproject.com/en/1.10/ref/settings/
DATABASES = {
'default': {
'ENGINE': 'django.db.backends.MysqL',
'NAME': 'cmdb',
'USER': 'root',
'PASSWORD': '123456',
'HOST': '127.0.0.1',
'PORT': '3306',
}
}
需要安装python的MysqL驱动
yum install -y MysqL-python.x86_64
通过admin页面管理数据:
cd /data/www/web/blog
vim vim admin.py
把表在admin.py里注册,admin才能识别
from django.contrib  admin
from blog.models  Host
或
import *  导入所有的类

 Register your models here.

如果要显示列,需要定义list_display列表:
 HostAdmin(admin.ModelAdmin):
    list_display = [hostname',ipaddr]


admin.site.register(Host,HostAdmin)
访问数据库
访问数据库(一)
如何访问数据,交互式方法:
python manage.py shell
from blog.models import Host //导入表
显示数据:
node = Host.objects.all()
node.values()
增加数据:
n1 = Host(hostname=‘node1',ipaddr=‘1.1.1.1')
或:
n1 = Host()
n1.hostname = ‘node1’
n1.ipaddr = ‘1.1.1.1’
n1.save() //写到表里
访问数据库(二)
通过视图文件views.py来访问数据
1.在urls.py文件里定义urls访问路径
vim urls.py
urlpatterns = patterns('',
# Examples:
# url(r'^$','web.views.home',name='home'),
# url(r'^blog/',include('blog.urls')),
url(r'^admin/',include(admin.site.urls)),
url(r'^blog/index/$',
url(r'^db/$','blog.views.db'),
)
2. 在views.py里定义访问方法
vim views.py
from django.template import loader,Context
from blog.models import Host
from django.shortcuts import render
from django.http import HttpResponse
def index(request):
return HttpResponse('<h1>hello django</h1>')
def db(req):
h=Host()
h.hostname='test'
h.ip='192.168.2.3'
h.save()
return HttpResponse('OK')
request,req:表示客户端向服务器端的请求,HttpRequest对象
访问数据库(三)
定义API
1. urls.py 定义访问路径
2. views.py 定义访问方法 (API)
def collect(request):
if request.POST: 或 request.method == 'POST'
hostname = request.POST.get('hostname')
ipaddr = request.POST.get('ipaddr')
host = Host()
host.hostname = hostname
host.ipaddr = ipaddr
host.save()
return HttpResponse('OK')
else:
return HttpResponse('not data')
注释掉csrf,让django识别curl
vim settings.py
MIDDLEWARE_CLASSES = (
'django.contrib.sessions.middleware.SessionMiddleware',
'django.middleware.common.CommonMiddleware',
# 'django.middleware.csrf.CsrfViewMiddleware',
'django.contrib.auth.middleware.AuthenticationMiddleware',
'django.contrib.messages.middleware.MessageMiddleware',
'django.middleware.clickjacking.XFrameOptionsMiddleware',
)
curl -d hostname='node05' -d ip='192.168.10.2' http://192.168.1.5:8000/db/
GET和POST方法
HttpRequest
request.POST.get('hostname')
或:
request.POST['hostname']
request.GET.get('hostname')
或:
request.GET['hostname']
传递数据
POST方法:
curl -d hostname='node12' -d ipaddr='12.12.12.12' http://192.168.3.72:8000/blog.collect/
GET方法:通过浏览器传递数据
http://192.168.3.72:8000/blog.get?hostname=n3&ipaddr=1.1.1.3
SimpleCMDB项目 urllib模块 urllib2模块 httplib模块
创建一个应用:
python manage.py startapp hostinfo
修改settings.py添加应用
admin.py
注册数据库:admin.py
from hostinfo.models import Host
class HostAdmin(admin.ModelAdmin):
list_display = ['hostname',
'vendor',
'product',
'osver',
'cpu_model',
'cpu_num',
'memory',
'sn']
admin.site.register(Host,HostAdmin)
syncdb
同步数据库
定义url访问路径
views.py定义访问方法
导入数据:
# cat data.sh
curl -d vendor='HP' -d product='2014' -d osver='rhel6.4' -d memory=4 -d cpu_model='Intel' -d cpu_num=8 -d sn='XXXXX' -d hostname='node2' http://192.168.131.10:8000/api/collect/
# bash data.sh
urllib,urllib2,httplib
使用urllib访问网页和传数据,通常urllib,urllib2这两个模块一起添加
req = urllib2.urlopen('http://192.168.131.10:8000/api/collect')
对字典data进行编码,生成post格式的数据
data ={'hostname':'node05','ip':'192.18.2.3'}
d = urllib.urlencode(data) #必须先要urlencode 才能传入url
req = urllib2.urlopen('http://192.168.131.10:8000/api/collect/',d)
req.read()
urlopen(url,data=None,timeout=<object object>,cafile=None,capath=None,cadefault=False,context=None)
data=None:请求的数据,post方式
urlencode(query,doseq=0)
Encode a sequence of two-element tuples or dictionary into a URL query string.
传入一个两个元素的元组或字典作为url查询字符串
print urllib.urlencode({'ip':'192.168.1.1','host':'123'})
ip=192.168.1.1&host=123 : 转化为url的post方式
vim models.py
from django.db import models
# Create your models here.
class Host(models.Model):
hostname = models.CharField(max_length=50)
ip = models.IPAddressField()
vendor = models.CharField(max_length=50)
product = models.CharField(max_length=50)
sn = models.CharField(max_length=50)
cpu_model = models.CharField(max_length=50)
cpu_num = models.IntegerField()
memory = models.CharField(max_length=50)
osver = models.CharField(max_length=50)
def __unicode__(self):
return self.hostname
class HostGroup(models.Model):
groupname = models.CharField(max_length=50)
members = models.ManyToManyField(Host)
创建HostGroup表,models.py
class HostGroup(models.Model):
groupname = models.CharField(max_length=50)
members = models.ManyToManyField(Host) # 多对多关系
注册数据库,admin.py
from hostinfo.models import HostGroup
class HostGroupAdmin(admin.ModelAdmin):
list_display = ['groupname']
admin.site.register(HostGroup,HostGroupAdmin)
python manage.py sqlall blog
BEGIN;
CREATE TABLE "blog_host" (
"id" integer NOT NULL PRIMARY KEY,
"hostname" varchar(50) NOT NULL,
"ip" char(15) NOT NULL,
"vendor" varchar(50) NOT NULL,
"product" varchar(50) NOT NULL,
"sn" varchar(50) NOT NULL,
"cpu_model" varchar(50) NOT NULL,
"cpu_num" integer NOT NULL,
"memory" varchar(50) NOT NULL,
"osver" varchar(50) NOT NULL
)
;
CREATE TABLE "blog_hostgroup_members" (
"id" integer NOT NULL PRIMARY KEY,
"hostgroup_id" integer NOT NULL,
"host_id" integer NOT NULL REFERENCES "blog_host" ("id"),
UNIQUE ("hostgroup_id","host_id")
)
;
CREATE TABLE "blog_hostgroup" (
"id" integer NOT NULL PRIMARY KEY,
"groupname" varchar(50) NOT NULL
)
;
CREATE INDEX "blog_hostgroup_members_521bb4b0" ON "blog_hostgroup_members" ("hostgroup_id");
CREATE INDEX "blog_hostgroup_members_27f00f5d" ON "blog_hostgroup_members" ("host_id");
COMMIT;
django和web服务器整合 wsgi模块 gunicorn模块
wsgi模块
wsgi:web server gateway interface web服务器网关接口
Django与Apache整合
安装
yum install -y mod_wsgi
cd /etc/httpd/conf.d
vim wsgi.conf
gunicorn模块
yum install -y epel-release
Django与Nginx整合
netstat -tulanp|grep :8000
使用这个命令来看8000端口是否开启,192.168.0.110上的8000是Nginx开的,127.0.0.1上的8000是python这个进程开的。
所以使用netstat -tulanp|grep Nginx这个命令是看不到的。
manage.py的用法
python manage.py runserver 8080
更改服务器端口号

python manage.py shell
启动交互界面,如果系统安装了ipython则启动ipython,否则启动python命令行,而且多了一些环境变量

python manage.py startapp books
创建一个app,名为books

python manage.py validate
验证Django数据模型代码是否有错误,models.py文件里面的代码是否有误

python manage.py sqlall books
为模型产生sql代码,但不实际执行

python manage.py syncdb
运行sql语句,在数据库里创建模型相应的Table

python manage.py dbshell
启动数据库的命令行工具
sqlite常用操作
跟MysqL一样,以分号 ; 作为一个语句的结束
sqlite> .tables
auth_group                  auth_user_user_permissions
auth_group_permissions      blog_host
auth_permission             django_admin_log
auth_user                   django_content_type
auth_user_groups            django_session

sqlite> .database
seq  name             file
---  ---------------  ----------------------------------------------------------
0    main             /data/www/web/db.sqlite3
1    temp

sqlite> .exit
[root@VM_centos web]#


sqlite> .schema
CREATE TABLE "auth_group" (
    id integer NOT NULL PRIMARY KEY,name" varchar(80) NOT NULL UNIQUE
);
CREATE INDEX django_admin_log_6340c63c" ON django_admin_log" (user_id);
CREATE INDEX django_session_b7b81f0cdjango_sessionexpire_date);


sqlite> .show
     echo: off
  explain: off
  headers: off
     mode: list
nullvalue: ""
   output: stdout
separator: |
    width:


sqlite> .help
.backup ?DB? FILE      Backup DB (default main) to FILE
.bail ON|OFF           Stop after hitting an error.  Default OFF
.databases             List names and files of attached databases
.dump ?TABLE? ...      Dump the database in an sql text format
                         If TABLE specified,only dump tables matching
                         LIKE pattern TABLE.
.echo ON|OFF           Turn command echo on or off
.exit                  Exit this program
.explain ON|OFF        Turn output mode suitable for EXPLAIN on  off.
.genfkey ?OPTIONS?     Options are:
                         --no-drop: Do not drop old fkey triggers.
                         --ignore-errors: Ignore tables with fkey errors
                         --exec: Execute generated sql immediately
                       See file tool/genfkey.README  the source
                       distribution for further information.
.header(s) ON|OFF      Turn display of headers on  off
.help                  Show this message
.import FILE TABLE     Import data from FILE into TABLE
.indices ?TABLE?       Show names of all indices
                         If TABLE specified,only show indices  tables
                         matching LIKE pattern TABLE.
.load FILE ?ENTRY?     Load an extension library
.mode MODE ?TABLE?     Set output mode where MODE is one of:
                         csv      Comma-separated values
                         column   Left-aligned columns.  (See .width)
                         html     HTML <table> code
                         insert   sql insert statements  TABLE
                         line     One value per line
                         list     Values delimited by .separator string
                         tabs     Tab-separated values
                         tcl      TCL list elements
.nullvalue STRING      Print STRING  place of NULL values
.output FILENAME       Send output to FILENAME
.output stdout         Send output to the screen
.prompt MAIN CONTINUE  Replace the standard prompts
.quit                  Exit this program
.read FILENAME         Execute sql  FILENAME
.restore ?DB? FILE     Restore content of DB (default ")  FILE
.schema ?TABLE?        Show the CREATE statements
                         If TABLE specified,only show tables matching
                         LIKE pattern TABLE.
.separator STRING      Change separator used by output mode and .
.show                  Show the current values  varIoUs settings
.tables ?TABLE?        List names of tables
                         If TABLE specified,only list tables matching
                         LIKE pattern TABLE.
.timeout MS            Try opening locked tables  MS milliseconds
.width NUM NUM ...     Set column widths for column mode
.timer ON|OFF          Turn the cpu timer measurement on or off
django中的模型三种关系
1=>N | 1<=>1 | N<=>N 三种关系
1对多:ForeignKey
1对1:OneToOneField
多对多:ManyToManyField
class Student(models.Model):
student_name = models.CharField(verbose_name=u'student name',max_length=100)
school = models.ForeignKey(School,on_delete=models.CASCADE,verbose_name='student school')
teachers = models.ManyToManyField(Teacher,verbose_name='students teachers')
bed = models.OneToOneField(Bed,verbose_name='student bed')
django女孩博客
http://blog.djangogirls.org/
