Nginx (engine x) 是一个高性能的HTTP和反向代理服务,也是一个IMAP/POP3/SMTP服务。
wsgi是PythonWeb服务器网关接口(Web Server Gateway Interface),WSGI是作为Web服务器与Web应用程序或应用框架之间的一种低级别的接口,以提升可移植Web应用开发的共同点。WSGI是基于现存的[[CGI]]标准而设计的。
Django是一个开放源代码的Web应用框架,由Python写成。
Virtualenv指的的Python的虚拟环境
supervisor管理进程,是通过fork/exec的方式将这些被管理的进程当作supervisor的子进程来启动,所以我们只需要将要管理进程的可执行文件的路径添加到supervisor的配置文件中就好了。此时被管理进程被视为supervisor的子进程,若该子进程异常中断,则父进程可以准确的获取子进程异常中断的信息,通过在配置文件中设置autostart=ture,可以实现对异常中断的子进程的自动重启。
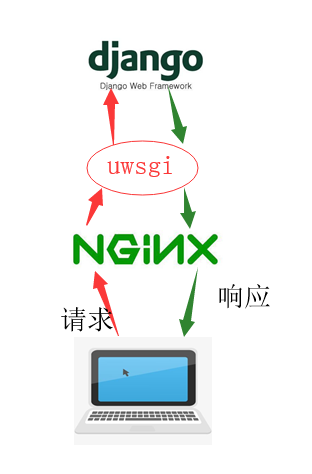
整个请求和响应流程如下:
一、Python环境的准备
说明,系统为centos 7.3
1 安装python3
安装python 3.4和对应版本的pip
[root@node1 ~]# yum install python34.x86_64 python34-pip.noarch -y
2 安装虚拟环境
[root@node1 ~]# pip3 install virtualenv
(1)创建虚拟目录
[root@node1 ~]# virtualenv django
(2)进入虚拟目录
[root@node1 ~]# cd django/
(3)启用虚拟环境
[root@node1 django]# source bin/activate
可以看到目录地下有默认的几个文件夹
(django) [root@node1 django]# ll
total 0
drwxr-xr-x 3 root root 330 Nov  5 15:00 bin
drwxr-xr-x 2 root root  24 Nov  14:55 include
drwxr-xr-x 3 root root  23 Nov   lib
lrwxrwxrwx 1 root root  16 Nov  55 lib64 -> /root/django/lib
二、Django的安装与项目创建以及配置
1 安装Django,这里使用1.11版本
(django) [root@node1 django]# pip3 install django==1.11
Collecting django==
  ……………
Installing collected packages: pytz,django
Successfully installed django-1.11 pytz-2018.7
2 创建项目和应用
(1)创建名为mysite的项目
(django) [root@node1 django]# django-admin startproject mysite
(2)创建名为app01的应用
(django) [root@node1 django]# cd mysite/
(django) [root@node1 mysite]#python3  manage.py  startapp  app01
(3)可以看到mysite项目下有如下目录
(django) [root@node1 mysite]# ll
total 4123 Nov  07 app01
-rwxr-xr-x 1 root root 804 Nov  04 manage.py
drwxr-xr-x 93 Nov  07 mysite
3 修改默认配置文件
(1)修改Django配置文件mysite/settings.py
ALLOWED_HOSTS = ['*']

注册app01
INSTALLED_APPS = [
app01.apps.App01Config,....
]

静态文件目录
STATIC_URL = /static/
STATICFILES_DIRS=[
    os.path.join(BASE_DIR,"static"),]
(2)修改路由匹配规则mysite/urls.py
from django.conf.urls import url from django.contrib admin from app01 views urlpatterns = [ url(r^admin/^index/功能,修改app01/views.pyfrom django.shortcuts HttpResponse def index(request): return HttpResponse(Hello World!')4 启动Django
(django) [root@node1 mysite]# python3 manage.py runserver Performing system checks... ……. Starting development server at http://127.0.0.1:8000/ Quit the server with CONTROL-C.测试访问
[root@node1 ~]# curl http:127.0.0.1:8000/index/ Hello World!三、uwsgi的安装与配置
1 由于使用pip3 install uwsgi 安装会报我不能解决的错误
在ubuntu上不会有这个错误
Command /usr/bin/python3.4 -u -c import setuptools,tokenize; __file__=/tmp/pip-install-k0ebn5sl/uwsgi/setup.py; f=getattr(tokenize,open\r\n',1)">\n); f.close(); exec(compile(code,__file__,1)">exec')) \ install --record /tmp/pip-record-eekd779j/install-record.txt \ --single-version-externally-managed \ --compile Failed with error code 1 in /tmp/pip-install-k0ebn5sl/uwsgi/故采用以下安装方式(仅限centos):
[root@node1 ~]# install uwsgi 查看版本 [root@node1 ~]# uwsgi --version 2.0.17.12 安装uwsgi-plugin-python3
注:插件 Ubuntu不需要此步骤
[root@node1 ~]# install -y uwsgi-plugin-python34.x86_64为解决启动报错:
!!! UNABLE to load uWSGI plugin: /usr/lib64/uwsgi/python_plugin.so: cannot open shared object file: No such file or directory !!!
[root@node1 ~]# ln -sv /usr/lib64/uwsgi/python34_plugin.so /usr/lib64/uwsgi/python_plugin.so3 启动uwsgi
(django) [root@node1 mysite]# uwsgi --http-socket :8888 --plugin python --wsgi-file ./test.pyUbuntu下:uwsgi --http :88888 --wsgi-file test.py
4 测试
[root@node1 ~]# curl http:127.0.0.1:8888/index/ This is uwsgi testapplication(env,start_response): start_response(200 OKContent-Typetext/html)]) return [bThis is uwsgi test"]5 报错解决
(1)invalid request block size: 21573 (max 4096)...skip
buffer-size = 65536
(2)-- unavailable modifier requested: 0 --
-- unavailable modifier requested: 0 –
plugins = python #指定插件
四、Django与uwsgi的结合
1 热启动Django
(1)uWsgi热加载python程序(仅做测试使用)
(django) [root@node1 mysite]# uwsgi --http-socket :8000 --plugin python --module mysite.wsgi --py-autoreload=1按下Ctrl +C 可终止进程
(2)启动Django
(django) [root@node1 mysite]# uwsgi --http-socket :8000 --plugin python --module mysite.wsgi2 在/etc/目录下新建uwsgi_Nginx.ini
uwsgi支持ini、xml等多种配置方式,本文以 ini 为例,添加如下配置
[root@node1 ~]# cat /etc/uwsgi_Nginx.ini [uwsgi] # Django-related settings # the base directory (full path) #Django项目的目录 chdir = /root/django/mysite # Django's wsgi file module = mysite.wsgi # the virtualenv (full path) #虚拟目录的路径 home = /root/django # process-related settings # master master = true # maximum number of worker processes #启动进程数,处理器个数 processes = 1 # threads = 4 #线程个数 # the socket (use the full path to be safe #指定套接字 socket = 0.0.0.0:8000 # ... with appropriate permissions - may be needed #权限设置,要是提示权限不够,可以改为666 # chmod-socket = 664 # clear environment on exit #退出时清除环境 vacuum = true #指定插件,不然会报错:-- unavailable modifier requested: 0 -- plugins = python3 指定配置文件并启动uwsgi
[root@node1 ~]# uwsgi --ini /etc/uwsgi_Nginx.ini五、 配置Nginx结合uWSGI
1 安装Nginx
[root@node1 ~]# install Nginx –y2 新建Nginx配置文件
[root@node1 ~]# vim /etc/Nginx/conf.d/djang.conf server { listen 80; server_name 192.168.15.128; #指定本机ip或者配置你的域名 location / { include /etc/Nginx/uwsgi_params; uwsgi_pass 0.0.0.0:8000; } location /static { #配置静态文件目录 alias /root/django/mysite/static; } location /media { alias /root/django/mysite/media; } error_page 500 502 503 504 /50x.html; location = /50x.html { root html; } }3 启动Nginx
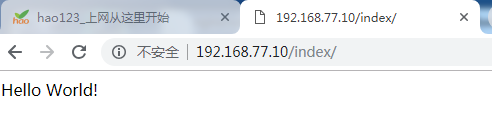
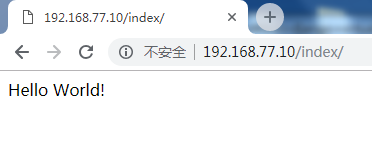
[root@node1 ~]# systemctl start Nginx此时以及可以测试访问了
[root@node1 ~]# curl http:127.0.0.1/index/ Hello World!用浏览器测试如下
六、Nginx结合supervisor
1 安装supervisor
[root@node1 ~]# install python34-setuptools.noarch [root@node1 ~]# install supervisor2 生成配置文件
[root@node1 ~]# echo_supervisord_conf > /etc/supervisord.conf3 编辑配置文件/etc/supervisord.conf
[program:mysite] command= /usr/sbin/uwsgi --uwsgi-socket 8000 --plugin python\ --chdir /root/django/mysite --home=/root/django --module mysite.wsgi directory=/root/django/mysite startsecs= stopwaitsecs= autostart=true autorestart=true说明:
# [program:mysite] 指定程序名称
# /usr/sbin/uwsgi 指定uwsgi的位置,
#--chdir /root/django/mysite 指定项目路径
# --home=/root/django 指定寻虚拟目录4 启动supervisor
最后启动supervisor,完成uWSGI启动django,Nginx反向代理
[root@node1 ~]# supervisord -c /etc/supervisord.conf此时配置完成!!至此,所有配置均已完成
操作说明:
supervisorctl -c /etc/supervisord.conf [start|stop|restart] [program-name|all]
(1)启动mysite程序
supervisorctl -c /etxc/supervisord.conf start mysite
(2)重启mysite程序
supervisorctl -c /etc/supervisord.conf restart mysite
(3)停止mysite程序
supervisorctl -c /etc/supervisord.conf stop mysite
(4)更新新的配置到supervisord
supervisorctl update
(5)重新启动配置中的所有程序
supervisorctl reload
参考:
https://www.cnblogs.com/pyyu/p/9481344.html
https://uwsgi-docs-zh.readthedocs.io/zh_CN/latest/tutorials/Django_and_Nginx.html
https://uwsgi-docs.readthedocs.io/en/latest/tutorials/Django_and_Nginx.html